Tuesday, March 30, 2021

Fairy Hugs Sivelle - An Evening Stroll

 Welcome to the Fairy Hugs Store Blog.

Please become a follower by signing up in the side bar!
If you would like to get the Fairy Hugs Store newsletter via email with updates
please visit the Fairy Hugs Store and sign up using the pop-up window.

Today I wanted to share my latest Fairy Hugs creation...


Seville is taking a moonlight stroll by the river...won't you come along?

To create this card I started out by stamping the bridge on the Fairy Hugs Moon Light Night background. I stamped it a second time on scrap paper to create a mask.

The Wooden Walkway was then aligned on a stamp positioner so it would connect perfectly with the bridge and stamped using Pinecone VersaFine Clair ink.

The mask was placed over the bridge and Wild Leaves were stamped in the background on the other side of the river bank.

Seville was stamped once on white cardstock and once on vellum. I inked the cardstock image with the same ink used on the background and she was fussy cut. The wings were cut from the vellum image and attached to the cardstock Seville.  She was then adhered to the card.

The clouds were stamped using VersaFine Clair Nocturne ink; as the final touch a bit of pen work and glitter was added to the card.


Be sure to stop by our Fairy Hugs Facebook Group 


Monday, March 29, 2021

Fairy Hugs - Kissing Fairy, sending pixie dust wishes!

  Hello everyone and Happy Monday!! 

Let's see what we can make using Fairy Hugs Store supplies! 

 I love this Fairy Hugs stamp called Kissing Fairy!

 Super fun card starting with the Fairy Hugs Background paper - Purple Fairy
Next i did some stamping with Fairy Hugs - Kissing Fairy
I colored her hair and wings with Prismacolor pencils.
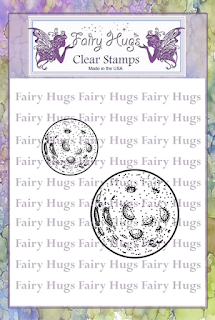
I then stamped Fairy Hugs - Full Moons and embossed them with copper embossing powder. 
Last, i stamped Fairy Hugs - Wild Leaves and embossed them with white embossing powder.
I glued some hologram sequins on the card making it look like the fairy was blowing pixie dust.
 
Fairy Stamper Store Supplies:


 Like us on Facebook

Follow us on Instagram: Fairy Hugs Store
 Join our Fairy Hugs Facebook Group here

 Don't forget to include #FairyHugsStore on your projects and tag us at @FairyHugstore so we can be sure to see and comment on your projects!

Sign up to receive Fairy Hugs Newsletters at the Fairy Hugs store.

 
Thanks for stopping by!

Sunday, March 28, 2021

Fairy Hugs Glittered Dancing Mushrooms

Hello and welcome to the Fairy Hugs Store Blog.


I created an easel card using the Dancing Mushrooms as the focal point stamping them in brown and green inks.  Creating a mask, I stamped the Fairy Bridge so it appears to be a part of the mushrooms.  Sponging assorted colors of Oxide Inks, I then stamped the Hanging Vines to appear like blades of glass.  Adding glitter, the Condo Dwellers began investigating the glittered mushrooms.

Fairy Hugs Supplies:


Like us on Facebook
Follow us on Instagram: Fairy Hugs Store
 Join our Fairy Hugs Facebook Group here

 Don't forget to include #FairyHugsStore on your projects and tag us at @FairyHugstore so we can be sure to see and comment on your projects!


Sign up to receive Fairy Hugs Newsletters at the Fairy Hugs store.


Thanks for stopping by.


Friday, March 26, 2021

Fairy Hugs sentiments! Once Upon a Time

  Hello everyone and Happy Friday!! 

Let's see what we can make using Fairy Hugs Store supplies! 

 I love this New Fairy Hugs sentiment stamp called Once Upon!
For this project, i started out using We Are 3 Digital Paper - Daydreams and a We Are 3 Digital Printable - Sky Scenes. 
Next i started stamping on the circle background. Then i stamped a small section of the Fairy Hugs - Stone Walkway and embossed it with clear embossing powder.  After that, i stamped the Fairy Hugs - Once Upon and embossed that with gold embossing power.  The last thing i stamped on the circle was the Fairy Hugs - Flying Dragon and i embossed that with clear embossing powder as well.
Now, i stamped the Fairy Hugs - Stone Castle on white cardstock.  I embossed that with clear embossing powder.  Then i inked the whole castle with Distress Oxide Ink - Pumice Stone.
I colored in the windows with colored pencil and the door with a gold gel pen.  Once that was done i hand cut out the Stone Castle.
More stamping... yes, i stamped the Fairy Hugs sentiment - Fairy Poem.  Then i ripped it in sections, inked it with Distress Oxide Ink - Faded Jeans and Blueprint Sketch.
For an added touch and to tie in with the the gold embossed sentiment, i got out the VersaMark and edged the sentiments with gold embossing powder.  I also tore the edges of the background paper and inked those with Versamark and added gold embossing powder to that as well.  Now all that is left is to add double-sided foam tape to the back of everything but the sentiment strips..i glued those.
Like us on Facebook
Follow us on Instagram: Fairy Hugs Store
 Join our Fairy Hugs Facebook Group here

 Don't forget to include #FairyHugsStore on your projects and tag us at @FairyHugstore so we can be sure to see and comment on your projects!

Sign up to receive Fairy Hugs Newsletters at the Fairy Hugs store.

 
Thanks for stopping by!

Fairy Hugs - Black Thistles - creating patterned paper!

   Hello everyone and Happy Friday!! 

Let's see what we can make using Fairy Hugs Store supplies!

 Stamping on Watercolor paper and using a bit of Brusho


 To see the entire tutorial on how to make your own patterned background, 
check out this YouTube video:


Fairy Hugs Products Used 


Like us on Facebook
Follow us on Instagram: Fairy Hugs Store
 Join our Fairy Hugs Facebook Group here

 Don't forget to include #FairyHugsStore on your projects and tag us at @FairyHugstore so we can be sure to see and comment on your projects!

Sign up to receive Fairy Hugs Newsletters at the Fairy Hugs store.

 
Thanks for stopping by!


Thursday, March 25, 2021

Fairy Hugs Store - Fantasy Flower Bouquet

 Welcome to the Fairy Hugs Store Blog.

Please become a follower by signing up in the side bar!
If you would like to get the Fairy Hugs Store newsletter via email with updates
please visit the Fairy Hugs Store and sign up using the pop-up window.

Today I wanted to share my latest Fairy Hugs creation...


A lovely bouquet of Fantasy Flowers for you.

To create this card I started off by cutting a 5x7 piece of white cardstock. I then sponged on various colors of purple VersaFine Clair Inks through the Pebble Beach stencil.

Next I stamped the Wild Leaves in Verdant and Shaded Lane VFC directly on the panel.

I then stamped the Wild Leaves and Fantasy Flowers on scraps of white paper. The Fantasy Flowers were colored using the same purples used for the background. All of these elements were then fussy cut and affixed to the card creating a bouquet using foam tape.

The final step was to add a bit of glitter to the flower centers and a bow.

This panel was then matted and added to a black card blank.

Fairy Hugs Supplies:


Be sure to stop by our Fairy Hugs Facebook Group 


Wednesday, March 24, 2021

Fairy Hugs - Kimba, at the end of the rainbow!

 Welcome to the Fairy Hugs Store Blog.
 
Kimba is such a beautiful magical creature.  I picture him here at the end of the rainbow about ready to enter through the fairy portal!


Fairy Hugs Stamps used:


 Like us on Facebook
Follow us on Instagram: Fairy Hugs Store
 Join our Fairy Hugs Facebook Group here

 Don't forget to include #FairyHugsStore on your projects and tag us at @FairyHugstore so we can be sure to see and comment on your projects!

Sign up to receive Fairy Hugs Newsletters at the Fairy Hugs store.

 
Thanks for stopping by!